
Some leaves on a favorite plant have started to look odd.
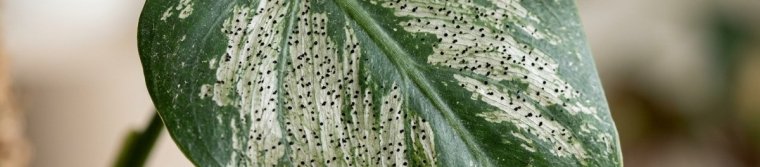
There are silvery patches where the green should be, and tiny black specks scattered across them.
You look for the culprit and see almost nothing, maybe a few thin slivers that wriggle away.
That combination often means thrips.
They are among the smallest pests you will meet on houseplants, and they hide well.
Still, a calm, patient approach keeps them under control.
This guide follows the University of California Statewide Integrated Pest Management Program and its Pest Notes on thrips.
What Thrips Are
Thrips are tiny, slender insects.
According to the UC program, most adults are less than one twentieth of an inch long.
Their narrow wings are edged with long fringes, which you can only see with magnification.
Their color ranges from pale white or yellowish to dark brown or black.
The young, called larvae or nymphs, have no wings and look like tiny pale slivers.
Not every thrips is a pest.
The UC program notes that some species feed on pollen or fungal spores, and some even hunt other insects and mites.
How Thrips Damage a Plant
Thrips feed by puncturing the outer layer of the leaf and sucking out the contents of the cells.
The empty cells turn pale and silvery.
Many small feeding spots together create a speckled or streaked look, called stippling.
Thrips also leave behind small black, varnish-like specks of excrement.
Those dark specks on silvery patches are one of the clearest clues.
On flowering houseplants such as orchids and African violets, some thrips feed on pollen.
The UC program notes that this can leave messy pollen on the petals and shorten how long flowers last.
Signs to Look For
- Silvery, pale, or bleached patches on leaves.
- Fine speckling on the leaf surface.
- Tiny black specks, often on the undersides of leaves.
- New leaves or shoot tips that look twisted, curled, or scarred.
- Flowers with streaks or spots, or buds that fail to open well.
- Very small, slender insects that move when you disturb them.
One detail makes thrips confusing.
The UC program explains that damage often appears only after the injured tissue grows and expands.
By then, the thrips that caused it may already be gone.
Step 1: Confirm That Thrips Are There
Other problems can look similar.
The UC program points out that mites, some true bugs, weather, and poor care can all cause damage that resembles thrips feeding.
So check before you act.
- Hold a sheet of white paper under a leaf or flower and tap it gently.
- Look for tiny slender insects moving on the paper.
- Use a magnifying glass or a hand lens to see them clearly.
- Look under several leaves for clusters of pale young and black specks.
A blue or bright yellow sticky card near the plant can also catch flying adults.
That makes it a useful early warning while you work through the other steps.
Step 2: Move the Plant and Check Its Neighbors
Thrips can travel on infested plants and drift between them.
Set the affected plant in a separate spot for now.
Then check the nearby plants the same way, with paper and a lens.
Pay special attention to flowering plants, since flowers often shelter thrips.
Step 3: Prune the Worst Leaves and Spent Flowers
The UC program recommends pruning off declining, injured, or infested plant parts.
On a houseplant, that means clipping the most damaged leaves and any old, fading flowers.
- Use clean scissors and cut at the base of the leaf or flower stem.
- Put the cuttings straight into a sealed bag in the trash.
- Wipe the blades before you move to another plant.
- Leave enough healthy leaves for the plant to keep growing.
One species, the greenhouse thrips, tends to feed in groups on the undersides of thick, broad leaves.
The UC program notes that its colonies spread slowly, so pruning them off early can work well.
Step 4: Rinse the Plant
Dust protects many small pests and slows down the natural enemies that eat them.
The UC program suggests periodically rinsing dust off small plants.
Indoors, a sink or shower makes this simple.
- Use lukewarm water and a gentle, steady spray.
- Tilt the plant so the water reaches the undersides of the leaves.
- Hold a hand over the soil to keep it in the pot.
- Let the pot drain fully before you put it back.
Our guide on how to clean houseplant leaves shows a gentle routine you can repeat every few weeks.
Step 5: Gentle Sprays, If You Need Them
The UC program describes thrips as difficult to control and says pesticides alone rarely work well.
If you decide to spray, it lists horticultural oils, insecticidal soaps, and pyrethrins for temporary control.
These work best against thrips that feed out in the open, such as greenhouse thrips.
- Spray only when thrips or fresh damage are present.
- Cover the undersides of the leaves, the buds, and the shoot tips thoroughly.
- Repeat as the label allows, since eggs and pupae are protected from sprays.
- Test on a small part of the plant first.
- Read the label and follow it exactly.
The UC program advises avoiding broad-spectrum insecticides.
It notes they are not very effective against most thrips and can trigger spider mite outbreaks.
Step 6: Be Patient With the Damage
This is the part that asks for the most calm.
The UC program is clear that no spray will restore leaves that are already scarred.
Damaged leaves stay marked until they drop or you prune them.
What you are watching for is clean new growth.
Check the plant every few days with the white paper test for several weeks.
When new leaves open clean and the paper stays empty, the plant can return to its usual spot.
Good Care Makes a Difference
Thrips have several generations a year, and in warm conditions one cycle can take about two weeks.
The UC program recommends keeping plants vigorous so they tolerate feeding better.
It also warns that excess nitrogen fertilizer may promote higher thrips numbers.
- Feed lightly, and only while the plant is actively growing.
- Water when the soil is dry about two inches down, as the University of Maryland Extension recommends.
- Give each plant the light it is adapted to, since a stressed plant suffers more.
- Remove fading flowers before they pile up.
Our guide on how to water indoor plants explains the watering routine step by step.
How to Prevent Thrips
- Inspect new plants and cut flowers before they join your plants.
- Keep new plants apart from your collection for two or three weeks.
- Look under a few leaves and at the flowers each time you water.
- Keep leaves free of dust.
- Keep a yellow or blue sticky card near flowering plants as an early warning.
Thrips damage can resemble spider mite stippling, so look closely.
Fine webbing points to mites, which our spider mite guide covers.
If you replace a plant and share your home with pets, check it in the ASPCA list of toxic and non-toxic plants.
Living With Thrips Calmly
The UC program notes that thrips rarely kill established plants.
Most of the harm is to looks, and new growth replaces it in time.
Confirm, prune, rinse, care well, and check again.
With that steady routine, the silvery patches become a memory as fresh leaves take their place.
Sources and Further Reading
- UC Statewide Integrated Pest Management Program — Pest Notes: Thrips: supports the identification, feeding damage and black specks, pollen on orchids and African violets, delayed damage, the white paper and sticky trap checks, pruning, rinsing dust, sprays and their limits, nitrogen, and greenhouse thrips.
- University of Maryland Extension — Watering Indoor Plants: supports the two-inch finger test and full drainage after watering.
- UC Statewide Integrated Pest Management Program — Pest Notes: Spider Mites: helps tell spider mite stippling and webbing apart from thrips damage.
- ASPCA Animal Poison Control — Toxic and Non-Toxic Plants: the reference for checking whether a replacement plant is safe around cats and dogs.